FOR THE LOVE OF SNOWFLAKES

Last week Haniela demonstrated a super cool method to decorate cookies with snowflakes, relying on Royal icing transfers (replay available here, in the live you can get links for the templates, or you can make them yourself). All you need to do is pipe the snowflakes, let them dry overnight, then paint them with an air-brush, which is of course optional. I actually made a set with them white, just sprayed with PME luster. So. Much. Fun. You HAVE to try this.

Aren’t they cool? Keep in mind snowflakes might be perfect when they are formed but once they fly around a bit and hit the ground, they won’t be perfect anymore. Did you see where I’m going? (wink, wink). So, first thing is to pipe them and use the air-brush in a vertical position to direct the spray exactly where you want it. Just a few drops in the little container, not more. Otherwise you cannot keep it vertical. I learned that trick from Haniela’s live which you can watch clicking here.

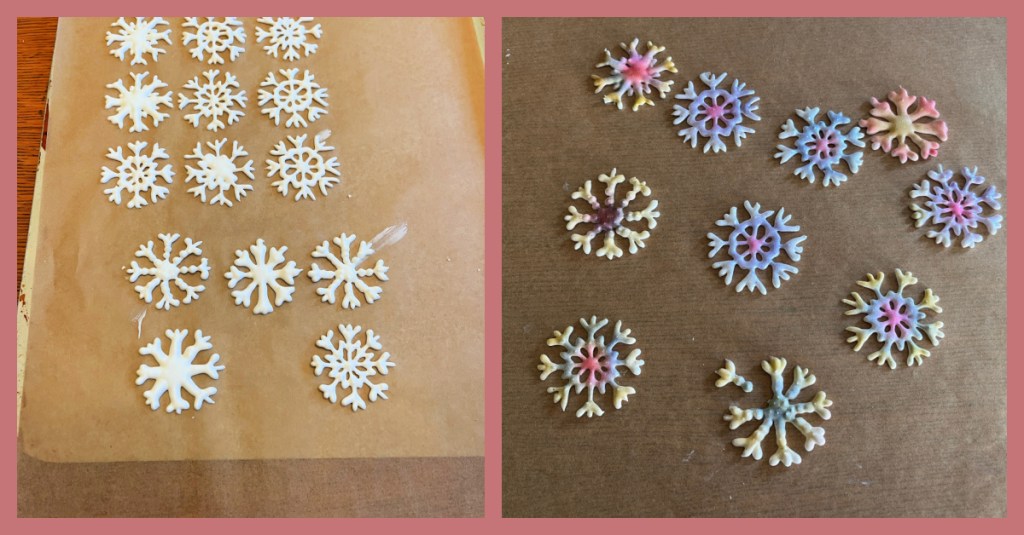
I hope you will notice that one of them broke after I painted. Haniela showed you can still use them, and I did just that. When you add the flake to the cookie, just place the broken bit right in its place, and allow the icing to set. Nobody will notice. You can see below all the steps to making these cookies, including the cosmetic surgery step.

I also loved the white on blue…

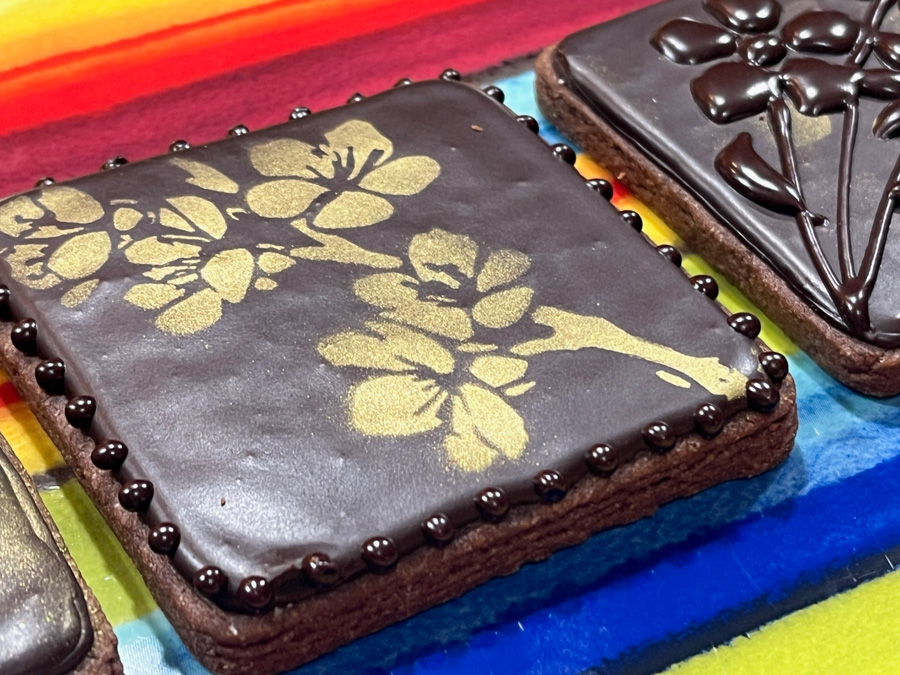
The bead border is again optional, but it always seem to elevate the look of a cookie, make it more polished. Plus, it is a nice thing to practice. I used to be absolutely scared of it.

Some of the flakes turned out better than others, but let’s pretend some of them just flew longer and hit the ground harder…

Hani, thank you so much for this live, I now feel much more confident handling the air-brush, this was a real game-changer for me.

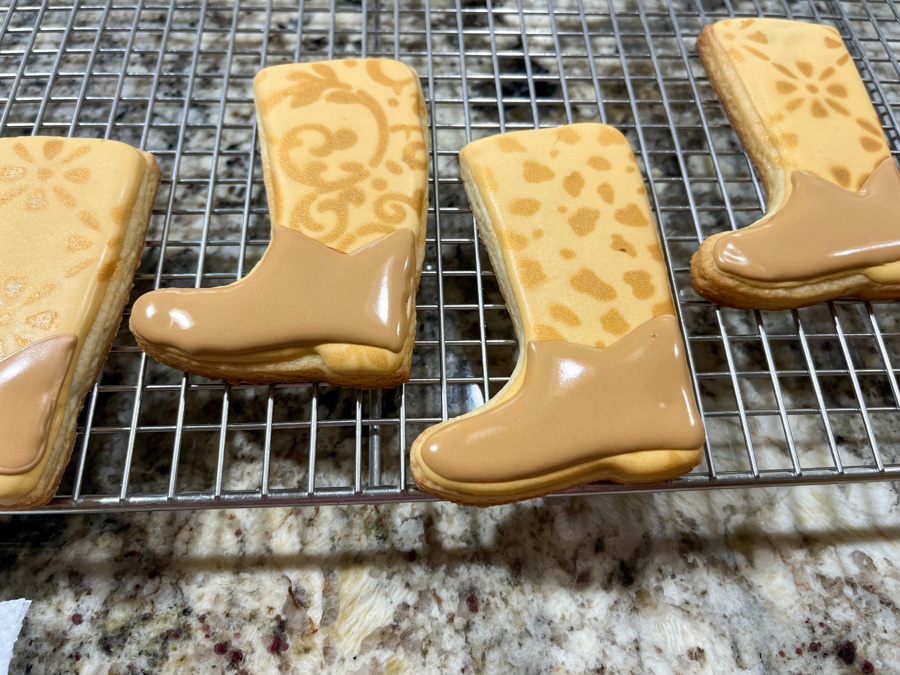
ONE YEAR AGO: Molded, Stamped, Rolled

TWO YEARS AGO: Baby Blue, from Me to You

FOR THE LOVE OF GOLF

I make golf-related cookies often, so that hubby can take cookies to share with his buddies. They play 9 holes, and when they step on the tee on the 10th hole, they get the cookies for that extra energy during the second half of the course. This is a collection of designs made in the past few months, starting around March.

THE GOLFER


For those, I used a mini-projector. Image was from Funky Cookie Studio. They go well together in a set with a golf ball on a tee, made in fondant.

Another design with a funky golfer, these were made for a tournament called “Eager Beaver”…

THE PUTTING GREEN

One of the classic ways to make golf cookies is showing the green with the flag and hole, and you can use many different cookie shapes and designs for that.

THE CANDY CORN GREEN

For these you work in stages, first the outline gets sprinkled with green sanding sugar, then the rest of the cookie is iced. For the sand trap thick consistency Royal icing worked with a brush.

THE TRIANGLE GREEN


Pretty much the same design, but the sand trap was a section painted with gold luster powder and vodka.

THE OVAL GREEN, TWO WAYS

.

THE FRAME GREEN

.

GOLF CARTS

For the golf carts above, the cookies were flooded with white icing and next day the design was painted using a projector to make the first draft. I used cluster powder diluted with vodka to get a more patchy look in the painting.

For this second design, a lot more work was involved as far as icing is concerned. Many colors and working slowly, one section at a time. And of course, personalizing the bags with the initial of the players can be a nice touch!

.

GOLF BALLS


Little fondant molds for those balls, set over iced cookies decorated with a stencil and air-brushing.


Larger molds for the fondant will also work, especially if you couple it with a big tee, piped with Royal icing and some grass details.

.

To make the effect of the golf ball, I used gray on white icing, wet on wet. First the gray dots are piped and immediately after a little white icing is added off center to give the shaded effect. The grass was added once the full icing was set, using thick consistency green and a tipless bag.

GOLF BAGS

Another design that requires a little more work, but is also very cute if you personalize with the player’s initials.

I hope you can find inspiration in this post, in case you find yourself trying to spice up (or sweetened up) the game of a golfer you love!

ONE YEAR AGO: Shirlyn’s Flamingo Gnome Fun

TWO YEARS AGO: For the Love of Flamingos


CAN ONE HAVE TOO MANY BOOTS?

Nah. Impossible. So here I am to offer another style to match your mood and outfit. These were my own design, coupling air-brushing with piping details. I hope you like them!

The design is actually pretty simple to make. Start by flooding the whole cookie with your choice of background color, I used GOLD from Americolor. That needs to fully set, so you can air-brush with stencils of your choice. I used gold. Next, mark with a pen a curved line so you can pipe the details.


I used a tiny amount of Dark Brown from Sugarflair on medium consistency icing to make the boot. Once that sets, you can go back to pipe the details using piping consistency Royal icing in the same color.


Some gold sequins closed the design, and a little work with the needle on the heel.

These are fun to make and the possibilities of designs are pretty much endless. If you don’t have an air-brush machine, you can use some simple wet-on-wet decoration for the boot and it will also look nice. You can go for dots or even flowers.

Ok, I might be done with boots for a while… or maybe not!
😉

ONE YEAR AGO: Queen of Hearts

TWO YEARS AGO: Shark Attack!

FRED, THE GNOME

As you may know, I am a firm believer that love-inspired cookies never go out of style. I refuse to limit them to the month of February. Today I invite you to meet Fred, a hopelessly romantic gnome….

This is a very simple cookie project, that relies on a set of 5 cookie cutters, available at aliexpress.

Once you get all pieces baked, simply flood them with Royal icing in the colors of your choice. For the hat, I used a method taught by Amy from @seriouslysweet, to get the little fabric folding effect. Then I added a few little pink dots and next day painted some shading with blue gel dye highly diluted with vodka. The hands around the heart were piped with piping consistency Fleshtone from Chefmaster, which I also used for the nose.

The final detail I really like is air-brushing the edges with this product below…

It has a nice color, much lighter than black, very subtle. I love the way it gives an “aged” look to cookies, and I’ve been using it often, as you will be able to see in future posts.

.

ONE YEAR AGO: Amy’s Tropical Treasures

TWO YEARS AGO: Jeweled Butterflies

PLAYING WITH CHOCOLATE ROYAL ICING


Chocolate Royal icing is a departure on the regular, white type, made by replacing some of the powdered sugar with cocoa powder. I used the recipe published in Amber’s new cookbook (which I recently reviewed here). If you don’t have the book, you can always use recipes found online. Cocoa powder contains up to 22% fat in its composition, so it can be tricky to use in items that are normally very low in fat. Macarons and Royal icing are two examples. I ended up ordering a special cocoa powder that is fat-free (available here) and it worked a lot better. The icing was smooth, dried without bubbles, and behaved a lot like regular white icing. Works amazingly well for macarons also, but that is another story to be told another time… Chocolate Icing has intense flavor and a beautiful brown color. One of the simplest ways to dress it up is coupling it with a stencil and gold air-brushing.


You can also use the air-brushed image to take it one step further and pipe the design to lift the image…

Going one step further, wait until the piping is fully set (preferably overnight) and then have some fun painting. Sugarprism is the ideal product because you can blend the colors very easily and it has excellent coverage, even on a dark background. For this technique, I followed the idea of Michelle, inventor of Sugarprism, in one of her many wonderful Facebook videos.

Opinions were a bit divided on these cookies. Some people loved the painted look, others preferred the more austere piping without colors. But everybody thought gold goes very well with the dark cocoa background, and I fully agree…

If you have never used Chocolate icing, consider doing so. It is a great alternative when all you need is a solid background, plus it adds a nice chocolate flavor to your base cookie.

ONE YEAR AGO: For the Love of Ukraine

FOR THE LOVE OF HORSES

Marlyn is back inspiring me, I had this tutorial bookmarked for a while and finally gave it a go a couple of weeks ago. The cookie cutter (available at amazon.com), shaped as the head of a horse, is a little tricky as far as decorating goes, but as usual, Marlyn figures out a way to make it shine. Several different techniques went into the making of these cookies. You can pipe the flowers by hand using Royal icing, or simplify a bit and go with molded, painted fondant pieces. It is up to you.

Let me walk you through the steps to make this colorful design…. First, flood the cookie with light brown Royal icing, and let it set overnight. Then add the details using a stencil and brown air-brushing color (I used Totally Brown from Cookie Countess).

Once that is done, it is just a matter of adding some details with piping consistency Royal icing in green and brown, some confetti shaped gold bits, and the fondant pieces in the end…

Once the fondant pieces are added, the cookies are ready to party!

I love the modern-romantic look of these horses… I simplified a bit the design compared to what Marlyn did, so I advise you to watch her video and consider adding all the bells and whistles. What I love about her design is how unique it is, playful and whimsical at the same time. I bet any horse lover would be very happy getting a platter of these cookies.

ONE YEAR AGO: For the Love of the Sea

A ROSE

Stencils can come in very handy for those who cannot draw to save their lives. For this cookie, I coupled air-brushing with royal icing, and after the design set, I used luster powder to paint the details. It is a bit of a labor of love, I won’t lie. But if you enjoy painting, it is a pretty nice way to spend a few minutes of your time…


It all starts with a fully set, white flooded cookie. Then, a stencil such as this one, is used to lay the base for the drawing. I used only part of the stencil, which is quite large, appropriate for cake decoration.


You could conceivably stop right there. Maybe add a beaded border or spray the edges with gold. But, if you want to take the cookie one step further, get some piping consistency Royal icing and fill each section.


It is a three-day process, two-day minimum. You will need to flood the cookie on day 1, air-brush the design on the following day, pipe the icing and then wait at least 6 hours to paint, overnight is best.


Once again, the cookie could be left all white. It is polished, simple and elegant. But to me, the fun really starts with painting. So that’s what I did…


Many different kinds of stencils will work, but I find that larger designs are easier to negotiate. Depending on your skill with piping, you can go for more intricate drawings. If the areas are very close together, make sure to pipe regions that are not adjacent, let them set briefly, then continue. I will be playing more with this technique in the near future for sure…

ONE YEAR AGO: For the Love of Frida Kahlo

THE MANDALA HAND

Of the many cookie adventures I’ve embarked in the past year, I suppose this was the most challenging. Maybe. It is a heavy competition with the Chinese New Year of the Tiger set, also designed by Marlyn. It involved cutting four different stencils, layering the different colors by air-brushing, and once all is said and done, piping fine lines all over the design. I made the cookie twice, and share two different ways to do it. The second version a little easier because you will be using a food safe pen to make the outline.

This is a very large cookie, about 7 inches tall. It needs to be large or you will have too much trouble working the details. Marlyn shared the stencils needed for the air-brushing. I had some trouble adjusting their sizes to match nicely, but managed to make the design work. It is so busy that some small variations did not compromise too much. Below you see the steps, each stencil is used in a particular order so that the colors will not only work on their own, but also combine with the previous color added, to give a different one. Super clever.

The first stencil is the yellow color, and also requires a mask (eye-shaped) so that the eye stays white. The air-brush would blow that mask away, so a little magnet is added to keep it in place – however, when I decided to tweak that layer of color, I forgot to put the magnet back, and the mask flew away, so some yellow went into the white region. Live and learn. Cookie and learn, actually. The top right photo has two colors layered already (yellow and pink). The bottom right has the blue stencil added, and finally the bottom left shows all the colors applied (yellow, pink, blue, and green). Pink and yellow at parts combine to give orange, and blue and pink combine to give purple. Once all that is done and dry, the fine line piping can begin…

It is really a labor of love, but so much fun to see this cookie take shape!

I made a second one the following day because I felt I needed to practice. And decided to try filling the outlines with a food pen instead of piping Royal icing. It gives it a different look, and it is considerably easier to do, so keep that in mind. In this case, I flooded the background with gray icing. And added a spray of PME luster over the whole cookie once it was dry.

Every once in a while, I try to challenge myself by making a cookie that scares me to death… this was one. Huge thank you to Marlyn, who manages to demonstrate every single step so well that common mortals feel like they just might be able to cookie-it!

STENCIL FUN: A TESLA COOKIE SET

I’ve had my Cricut cutter since Christmas last year, a very thoughtful gift from my beloved husband. The learning curve to play with that baby is steep. So far I’ve mostly used stencils available online – many provided by Marlyn, from Montreal Confections, many from shops at etsy.com. In this post, I share with you my first adventure designing stencils myself. They were all super simple, using images available in the internet, and a straightforward cut. Stencils are great to design cookies for special occasions. This set was made for a potluck party we hosted recently for all Tesla owners in our town.

The simplest one was just the Tesla logo with the characteristic modern font. Once the image is found online, Cricut can size it to the desired cookie area. For that cookie, I flooded the base with red, let it set overnight, and spray painted with black. Since this is such a simple image, it is very important that the lines are sharp. I use a screen between the stencil and the air-brush to make sure no under-spray takes place. That takes a little practice, but now I feel a bit more confident using it. Some screens sold especially for cookies can be expensive. I am quite happy with this one, that is large enough to cover any size stencil, and also more affordable.

For the second type of cookie, I went with a gray background and either black or red air-brushing of the stencil image.

Yet another image – also found with a search for Tesla clipart in google – used a gold background and brown air-brushing. And finally the classic image of Tesla Model X (the one we own) with the Falcon wings open. I made some silver, some black.

Just for variety, I made a set of charging stations using the mini-projector and food pen.

This was a fun set to plan and make. Stencils make it quite straightforward, comparing the time needed to make each of the charging station cookies, the ones with the stencil are ready in the blink of an eye!

You can get by ordering stencils online, but it will limit a lot what you can do. In many cases you can order a stencil in different sizes, but there is little flexibility. For instance, some might offer three sizes, small, medium, or large, and you will have to bake your cookies to fit those sizes. If you own a Cricut (or Silhouette), you can tweak stencils to your needs, and also make your own. I have a lot to learn still, and to be absolutely honest, I feel quite discouraged at times. But I guess that is expected when learning a new skill.

AMY’S PINEAPPLE COOKIES

If you’ve been around this baby blog of mine for a while, you may have noticed that I follow a few selected “cookiers” very closely. Amy, from Seriously Sweet on Davis Street, is always inspiring me and pushing me to try more challenging techniques. At some point I will gather the courage to attempt one of her super elaborate “Tiki” creations. Hopefully soon. But today I share one small component of that series, her cute Pineapple Cookies. They were a ton of fun to make. My favorite part? The leaves, piped with a tipless bag, generating a cool 3-D texture. I was super scared to try it, but Amy’s tutorial is perfect! You can watch it here, the pineapple decorating starts around the 12 minute mark. Cutting the bag to pipe the leaves is shown at 27 minutes, give or take a few seconds. Brilliant!

It all starts with a little drawing on the baked cookie to help you out….

Then the sections of the pineapple are piped, allowing sections that are not touching each other to crust. Just 15 minutes or so, is more than enough, and you can come and complete the remaining sections.

Once the pineapple segments are crusted, Amy suggests using the air-brush to spray the edges with a very light touch of green. Ideally try to get all the outlines of each section, working very gently. These small details make the pineapple come to life. A bit of gold brushed on the leaves is also a nice touch. A cookie without those details would still be pretty nice, but if you can go the extra mile, why not?

I highly recommend that you watch Amy’s tutorials on Facebook, and consider joining her fun Facebook group called “Cookie Snack Attack with Seriously Sweet.” If you love to bake cookies and want to improve your technique while interacting with a bunch of people hooked on all things Royal icing… that group is for you!