MR. CLAUS IS ALSO COMING TO TOWN

There is no way Mr. Claus would leave the love of his life alone, so here he is! Another amazing online event by Amy, from @seriouslysweet, I could not decorate live with all the other participants because we were away on a trip, but the moment I came back home, I baked the cookies and went to work. This cookie cutter set is also available at dotsandbows with a click here. For a flashback to Mrs. Claus, go here.

Totally smitten with this cute old guy… So many details and techniques in this set! I finally got the hat effect – a folding of the fabric – to work. As I mentioned before, this type of detail I do not feel ok about sharing, as this was a paid event hosted by Amy. I am thrilled that it now worked ok for me. Poor Mrs. Claus went with a flat hat, without enough pizzazz.

We started by sketching all the details on the cookies, then slowing decorating each area, using all the methods of piping, from flood consistency to very thick for the white details. I feel that I messed up the eyes a bit, they did not turn out as good as Mrs. Claus’ but overall I am happy with this set.

My favorite technique is definitely the little ruffle on top of the gloves and boots. I just love doing it, and once you get the consistency and strength to squeeze the bag (with no icing tip), it’s very easy and fun.

So this closes the double Christmas set, the Claus Couple, ready to spread Holiday Joy around the world!

Amy, thank you once again for your super detailed instruction and patience with all of us following your online adventures!

ONE YEAR AGO: Zentangle Strikes Again

MOLDED, STAMPED, ROLLED
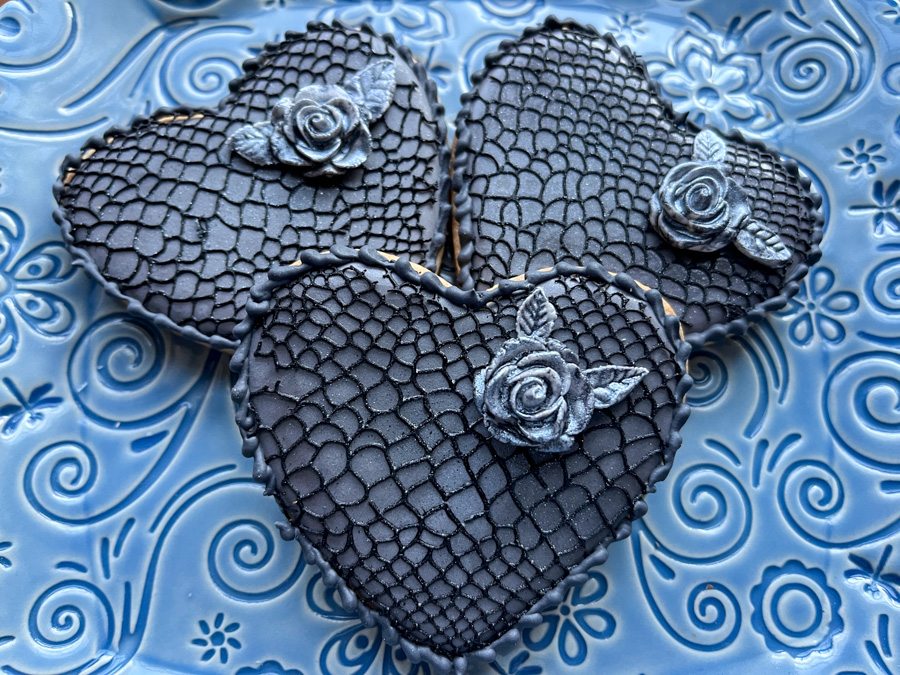
When you want to minimize icing and glazes on your cookies, resorting to molds, stamps and embossed rolling pins is the answer. The cookies will look great even if nothing else is done to them as far as decorating goes, but of course, if you go the extra mile, they will look super special. The key is to use a dough with little to no leavening agent. You might have to play with a few of your recipes to see which one performs best for each different pattern. It is fun to experiment, and even if some end up as failures, they will still taste great…

Links to every mold, stamp and rolling pin used in the cookies are included in the text.

DESIGN #1

FLOWER MOLD

For these cookies, I used this mold. Once they were baked, I sprayed the surface with PME pearl spray and then went over the details with luster powder mixed with vodka.

I love working with this mold, you can do egg yolk painting, egg white painting, work with marbled dough, or just add a simple light glaze with the color of your choice, for a more dramatic effect like below…

DESIGN #2

WOODEN MOONCAKE MOLD


I used this mold for the cookies, except the center one, which I don’t remember where I got, a while ago. They don’t need any adornment, the pattern is beautiful as it is, but a little bit of gold or copper never hurt! Working with these wooden molds takes a little bit of getting used to, but soon you will realize how much flour or cocoa powder to add to the mold for easier release. Chilling the dough helps a lot also.

DESIGN #3

PLASTIC MOONCAKE MOLD


For these cookies, I used molds similar to these. These make small but thick cookies. The plastic molds are easier to work with, because they come with a little thingie that pushes the dough out. Again, working with chilled dough is a must to help the pattern form well.

DESIGN #4

DRAGON STAMP


Stamp used can be found here. One of my favorites for sure. I just love the Game of Throne-ish look of this pattern. I do believe this one shines with a little gold or copper, but if you don’t have that available, no major harm done. Chocolate is a must, or any cookie dough that is dark and won’t expand during baking.

DESIGN #6

SPRINGERLE ROSES


Most of my springerle molds are from this shop at etsy. I need to optimize the recipe for these, that used strawberry powder in the dough, once I do that the recipe will be available on my main blog. I often paint springerle type cookies, but left these exactly as they baked for a change.

DESIGN #7

ROSES ROLLING PIN


The rolling pin used is available here. The cookies above were painted with Sugarprism, and made into Oreo-type sandwich cookies.

DESIGN #8

MODERN LEAVES ROLLING PIN

The rolling pin used is from this etsy store. I have used this pattern countless times, it looks great without any adornment, but I liked the mixture of copper and red that I used in this batch. It is just luster powder diluted with vodka and applied with a brush.

DESIGN #9

FOREST ROLLING PIN


This is the rolling pin used. In the batch above, the cookies were baked and left naked. The pattern alone is enough to give it a nice elegant look.

DESIGN #10

HIEROGLYPHS ROLLING PIN


This cute rolling pin is available here. In this batch I used lime and a touch of coconut, but they puffed a little more than usual, so the design was not as sharp. They were made into sandwich cookies with a lemon buttercream as filling.


ONE YEAR AGO: Baby Blue, from Me to You

BLACK LACE HEART

This design was imagined by Amber from @sweetambs a while ago and I changed just a few details when I made mine. The lace component is made with Sugar Veil and a special silicone mat (click here for details). I was very scared to use it because my previous experiences with sugarveil were very stressful and most did not have a happy ending at all. But Amber gave a few important pointers, like allowing the product to sit on the mat overnight instead of baking it in a low oven to dry. That’s what I did.

The other important thing is to roll the mat away from the veil, not pull the veil out of the mat, because it will tear, it is very delicate. You need to work slowly and gently guide the veil down the surface, as you pull the mat away from it. Pictures below show the process.


Once the lace is ready, pieces large enough to cover the cookie are cut, and placed over the fully set icing, using either a light brush with water or corn syrup (diluted with a bit of water for easier spreading with a brush). The edges won’t be very smooth, but after that step a little bead border will hide the imperfections. Rose details are fondant painted with luster powder and sprayed with PME pearl luster after drying.


After the lace is set, the fondant roses are glued to the cookie with a small amount of Royal icing. The bead border is important so that the edges of the lace do not show. I still need a lot of practice because my lace turned out super brittle, but compared to my previous attempts, this was much much better…

ONE YEAR AGO: Egg White Painted Cookies

MRS. CLAUS IS COMING TO TOWN

Too early? Nah, never too early for the visit of such a cutie pie… I am so enamored with this set, made thanks to the detailed online class hosted by Amy last weekend. Isn’t she adorable?


Amy taught some super cool techniques, and I cannot share the details, as this was a paid class and it would be unfair to her to publish it for free here. Trust me, though, if you are interested in improvement for your decorating skills, her online classes are a must! You can join her Facebook page and get updates on future classes with a click here.

This set of cookie cutters is from dotsandbows, and you can find it here. They work as a stacked composition of four to make Mrs. Claus in all her cute glory. Before class we needed to have the cookies baked, Royal icing in different colors and consistencies made, and fondant decorations dry and painted.

Below, some of the steps, starting with the sketch of all we would do to each cookie, everything drawn by hand, Amy explaining exactly where to place each line, how to curve it, etc. For me, who cannot draw a full moon… super helpful!

The coolest technique was to make the hat. I did not hit it correctly, but Amy showed us how to make the hat acquire folds, and wow, that was something! But my consistency – rather the consistency of my Royal icing – was a little too thick and I need to re-visit the issue in the future.

I also love the detail on the rim of the glove and the top of the boot, it is the second time she uses this technique in her decorating classes, and I now feel pretty comfortable with it.

I just loved this cookie design so much! I look at her and it is impossible not to smile… Thank you, Amy for another fun couple of hours on a Saturday afternoon… I look forward to the next adventure!

ONE YEAR AGO: Baby Turkey Cookie Platter

MARLYN’S INSPIRATION CHALLENGE FOR NOVEMBER

This month, the challenge was summarized in four simple words: “stand up your cookies.” Sounds like something out of a certain tent, right? Not sure if you are watching Great British Bake Off this year, but one technical challenge had an empty page with “make a lemon meringue pie,” Poor contestants…. But, I am not in a tent, no pressure, no cameras, no microphone shoved in my face as things get tricky. Here I am to share the results of my labor, I am quite happy about this composition, and hope you like it too…

For Marlyn’s Facebook page, click here

For Haniela’s Facebook page, click here

The base for the composition is my default chocolate cookie recipe, which you can find in my main food blog with a click here. I constructed a little box, but ended up not using the base, just the sides as it went glued on the base anyway. So here are all the parts baked.

Once the basic components were baked, I started decorating. A couple of weeks ago I took an online class with Haniela where she taught us how to pipe succulents using Royal icing, and I made a bunch during class, and decided to incorporate them in my cookie scene.

The random-shaped base was iced in green with a thicker consistency so I could give it some texture using a brush. The box was also iced with a thicker consistency and the lines added after 15 minutes or so with a needle. Air-brushing gave it a more natural look, so that the color is not too homogeneous. The copper color of the base was just luster powder, applied dry with a soft brush. Acorns are painted fondant, made using a silicone mold.


Squirrels and pumpkins were decorated with Royal icing.


The fun part is definitely assembling it all together… I really enjoyed planning and then making the scene happen. I took the cookie set to our department and I got pretty nice feedback on it. Of all the inspiration posts so far, maybe this is my favorite. Let’s see what Marlyn has in mind for December… Stay tuned!

ONE YEAR AGO: Egg Yolk Painted Cookies

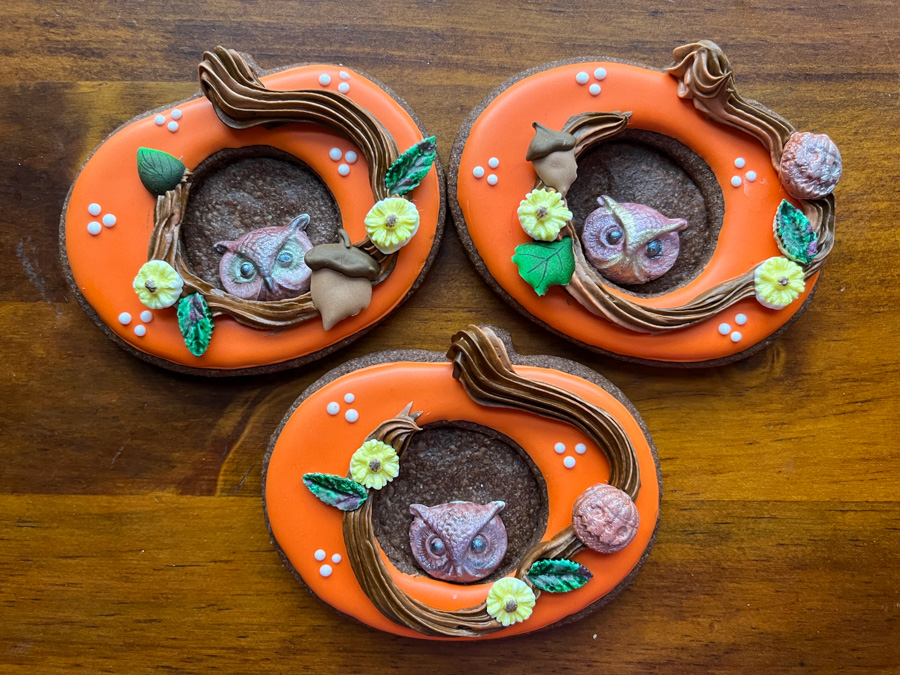
FOUR LITTLE PUMPKINS

Who said pumpkin-shaped cookies need to be always orange and brown, same old same old?
Today I share four versions that expand the horizons of the Pumpkin World.

VERSION #1

WOODLAND PUMPKIN

I was absolutely smitten by this design, created by Marlyn, from Montreal Confections. You can see her tutorial clicking here. I modified just a few little details, like using chocolate dough, so that the background was already dark and I did not need to paint it.

Cookies are baked with a circular indentation in the center, then the outer region is flooded with orange Royal icing. Once that sets, thick Royal icing dyed with a marbled brown makes the decorative stems. Little decorations are added (mine were painted fondant), and you are all set!


Of course, I had to make a little Halloween version at the time….

VERSION #2

BLACK AND WHITE PUMPKIN

This was my own design, could not be simpler. Just flood the center portion of the pumpkin with white, wait about 15 minutes, flood the adjacent sections and immediately pipe black dots of icing. Once that sets, add the details in black, with thicker consistency icing.


VERSION #3

THE HAUNTED PUMPKIN


If you miss Halloween, here is a little comfort for you… can a design be any more adorable? This was posted by Haniela in a Facebook live a couple of weeks before Halloween. She gilds the lily using air-brush, but if you don’t have that, a little luster powder will work too. To watch her tutorial, click here.

General steps shown below…


VERSION #4

PLAID PUMPKIN


Another super cute design by Haniela, I lost my pictures of the different steps in the design, but it is quite straightforward, and you can watch Haniela demonstrate it with a click here. All wet-on-wet, flood with the color of your choice, and then add straight lines in two contrasting colors. Allow that to set, then add details. Mine were Royal icing transfers in the shape of sunflowers and small leaves. I need more practice with the fine lines, so I consider these a “work in progress.”


I hope you can find some inspiration in this set, as the season for pumpkin in cookie shape is still going strong… I know for sure I am not done yet!


ONE YEAR AGO: Zentangle Cookies, Tangled up in Zen

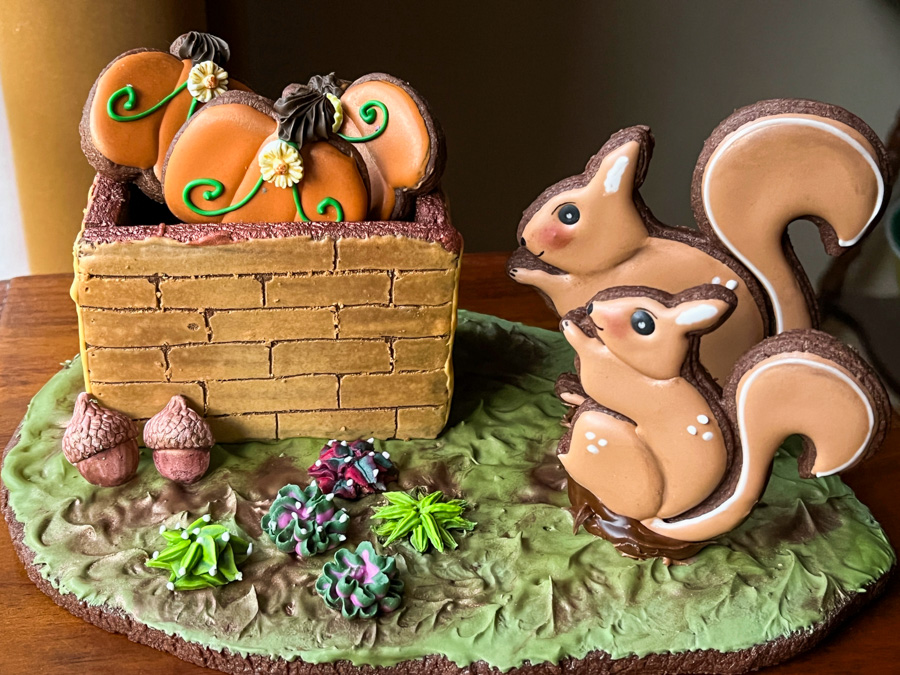
FOR THE LOVE OF FALL


Inspiration for these cookies came from a design I saw in the internet a while ago, captured a quick screenshot, but forgot to save the source. It coupled hearts with fall leaves, and I think it is a nice cookie tribute to one beautiful season in our beautiful planet.


Bringing this design to life is not difficult at all. You will need just white Royal icing in flooding consistency, but not too loose because you want to be able to get some volume in the different sections, and also you don’t want to risk them joining together. I sketched the leaves on the naked cookie, piped the leaf component first, allowed it to set for 10 minutes or so, then came back and did the rest.


Once that is fully set, at least 4 hours, you are ready to paint the details. You can use food gel diluted with vodka, or go for Sugarprism, which is my favorite option. Let your inner Monet fly!


Sugarprism dries quickly, wait about 20 minutes and you will be ready to add the details. I used Royal icing dyed with Americolor Gold, in piping consistency, and a piping tip #1. Later I painted the details with luster gold powder diluted with vodka, but that part is optional, the design will be ok without this step.


They are a little time-consuming but not too bad, and if you enjoy painting they give you a chance to get some Zen-time…

ONE YEAR AGO: Gobble Gobble!

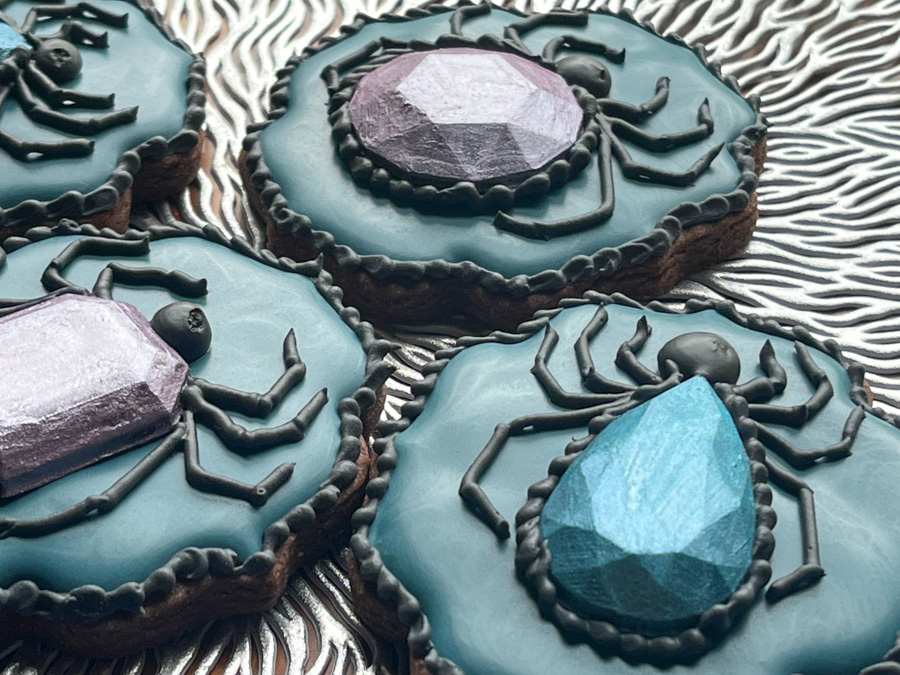
AMBER’S JEWELED SPIDER

I realize Halloween is over, but these cookies are so cool that I believe they deserve a post just for themselves… Plus, they would be great to give to that special person who is into gothic looks, and appreciate that mood any day of the year. You will need a mold to make the body of the spider, but other than that, the cookies are not that complicated to make.

For Amber’s tutorial, visit this youtube link.


It all starts by making the body of the spider, using this mold. You can use candy melts but Amber recommends Celebakes brand. I played with two other brands I had around and they did not work, it never hardened enough. So I used Almond Bark (dark chocolate flavored) and it worked like a charm! Much easier to melt and work with, hardened with a nice shine. After that, it is just a matter of painting it with luster powder in any color you like. Make it shiny, though.

Below the overall plan of the design, that will go once you flood the cookies with Royal icing in the color of your choice.

Once the flooding is done (I used a mixture of wedgewood, dark blue and black to make a color I probably won’t ever be able to repeat… 😉 you are ready to work.

The body of the spider is glued with a small amount of Royal icing, and then the details added with piping consistency icing, using a Wilton tip #3. A little border on the edge of the cookie and the outline of the spider. Nothing else needed. You can paint the black with silver as Amber did in her video, or leave it dark. Your cookies, your choice…

I really love this design and intend to make it again soon, maybe with a Christmas color schemed and details painted in gold. Also, the jewels can be used as simple stones in cookie compositions, so it is a nice mold to play with.

ONE YEAR AGO: Halloween Withdrawal Syndrome