MACARON LOVE

Today I share a new way to decorate macarons, something a friend saw on TikTok (click here), urged me to try, and I did not think twice! The concept of adding textural design to the shell is not new, in fact I’ve made many batches using a fondant baller tool to add a pattern to the surface (check one of my first versions clicking here). All you need to do is wait for the shell to crust, then work your magic. Today’s version uses a small heart-shaped cookie cutter dipped in luster powder to imprint a little heart on the shells. Depending on how hard you press the cutter, you can get a nice lift on the design. I used the French meringue method, and filled these macs with raspberry buttercream.

Once the shells are piped, wait for them to crust. Then, choose the shape and size of cutter you want for the design. Since macarons are so small, you’ll need cutters that are normally used for fondant. Dip the cutter in luster powder (I used copper color), and press it on the surface of the shells, right before sticking them in the oven.

You can do a single heart or a couple of small ones. You can do circles, or a little butterfly could be cute for spring. After the shells baked, I painted some of them with luster powder diluted with vodka.

It was very cool to see them bake and the design lift in some of them. If you don’t want that to happen, make the impression without hurting the surface too much. If you are going for the lift, use a sharp cookie cutter and press it down a bit more. As I was not sure how well that would work, I left some shells without any decoration and painted them later with stripes. I did not use a stencil, just a brush. I love the mixture of designs in a same batch.

I intend to explore a few other ways using imprinting of the shells, so stay tuned for more adventures!

ONE YEAR AGO: Of Bears and Bunnies

SPRINGERLE FOR LOVE

Someone is getting married today!

I made these as party favors for my niece Camila’s wedding. Normally I don’t do large batches of cookies, but this was a special occasion, so twenty-five cookies of each style materialized in our kitchen. It was – I cannot lie – a labor of love, but totally worth it! Unfortunately I could not attend the ceremony, as we are back in the US, but I am definitely there, at least in cookie format…

It all starts with baking the cookies and allowing them to dry for 48 hours. I used my default recipe for Springerle, which you can find in my main food blog clicking here. Once they are baked, the fun begins. Yes, each one is painted by hand, I do one color at a time in all cookies to make the process easier and faster. You can find a video showing the whole process included in this post of my recent past. In this batch, the heart-shaped cookies were not painted, just sprayed with PME luster (pearl or a combination of pearl and pink).

I chose to make Springerle because they are supposed to last for a long time, and I had to make them 6 weeks before the big day. These are small cookies, and each guest received two in a small package. I hope they liked them…

Four colors were used for the floral cookies: pink, green, peacock blue, and gold for the edge. Some of them got an extra detail of pearl here and there just to add variety.

For the hearts, things happened a lot faster, as I used the spray to coat the surface. Some got white, some got pink mixed with white, as the pink alone would be a little too strong for what I had in mind. I wanted the to be delicate and subtle.

ONE YEAR AGO: Of Bears and Bunnies

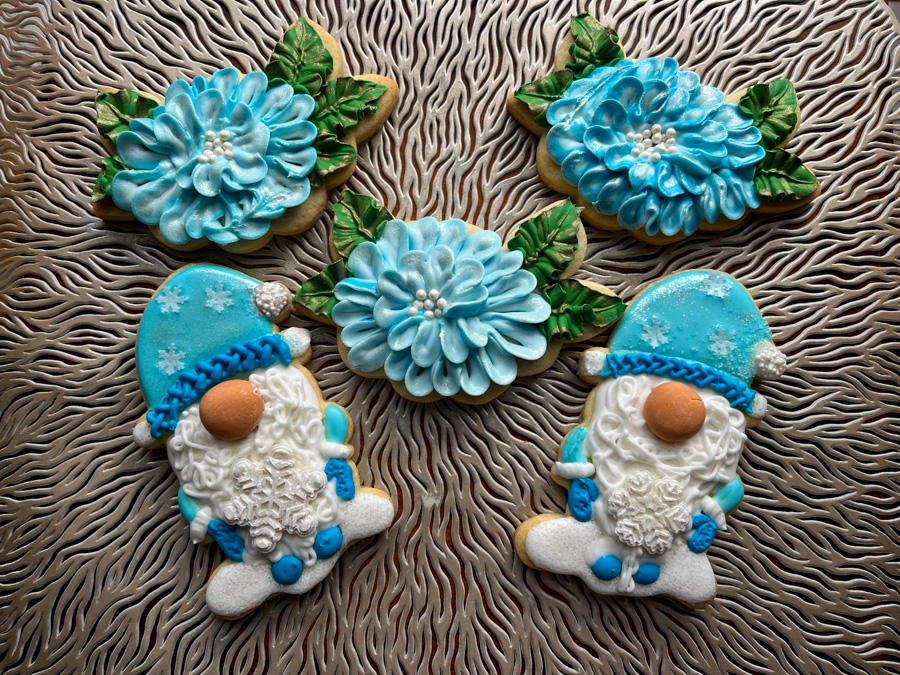
INTRODUCING THE GNOME & FLORAL ADVENTURE

If you’ve been following my cookie blog, you are familiar with all the online classes taught by Amy from Seriouslysweet. For the new year, she came up with a very fun series: each month we get to make two cookies, one gnome and one floral, with a similar color scheme so that they go together like a perfect match. January started with Frosty Gnome and his blue-tone flower. I cannot tell you how much fun it was to bring these cookies to life, and you can do it too! Just join her site (link below) and sign up for the whole series. You will need the cookie cutters also, although you could conceivably cut them by hand or use a similar cutter you already own. The videos are all pre-recorded and the classes follow her usual format, so you will also receive a little card with all the specific things you need for each cookie.

To join Amy’s online tutorials, visit her site clicking here.

I love when cookies make me smile, and these gnomes do it, big time! So many details… First, you need to make the nose with fondant or modeling chocolate, once that is ready you can start piping the different sections and adding all the bells and whistles.

Apart from the fondant noses, you’ll need little snowflakes made with wafer paper and a small punch type cutter, but if you don’t have that, you can add snow-shaped sprinkles. The paper creates a nice lift, though. The gloves get some texture with the needle, and the beard is made using one of Amy’s favorite techniques, which I don’t feel it is right to share, as the class is a paid event. The final touch is a large snowflake made with fondant, and spray painted with Wilton pearl Color Mist. I made a little heart to go with that set also… Aren’t the gnomes the cutest?

The matching flowers are much simpler to make, even if they seem complicated. All you need is Royal icing in the right consistency (thick), a petal and a leaf piping tips. I added some sprinkles to the center and once the icing was fully set I painted the edges with luster powder, white for the petals and copper for the leaves.

I’ve enjoyed every single online class from Amy, but this one has got to be one of my favorites of all times! It was wonderful to see that little gnome taking shape, and although it is not a class for beginners – you need to be comfortable making and handling Royal icing in several different consistencies – it is not over the top advanced.

If you’d like to challenge your cookie decorating a bit, I urge you to join Amy’s site and sign up for the upcoming classes. Her group on Facebook keeps getting bigger and bigger, it is great to see everybody making progress in their own path of decorating cookies.

Amy, I look forward to February and its set of gnome and floral!

ONE YEAR AGO: The Year of the Tiger Cookie Platter

TUNDE’S BEAUTIFUL BLUE COOKIES

This online tutorial by Tunde Dugantsi was posted on January 5th, but I was away on a trip. The moment I came back I went to work, baking the seven hexagon cookies and making enough icing to play with them all. Truth is, after being away I was a bit rusty, and struggled a little with a couple of the designs. Still, I love this set, and felt that the class was at the same time challenging and fun. Tunde has a very soothing voice and is quite reassuring, plus she gives many tips to help you navigate all the different techniques. In this set, we had to master fine lines (very fine, to pipe a grid on two cookies), brush embroidery, border piping, and of course, smooth flooding.

To join Tunde’s Facebook page and learn about her upcoming classes, click here.

Tunde planned the whole class in a very efficient way. We started by flooding two cookies in a single color (light and dark blue), and the others had a design scratched on the surface, so that two colors would be used to flood, in stages. or a single color leaving a round circle in the center to pipe the grid. Some of the steps are shown in the composite picture below.

After I baked the cookies, I realized that my hexagons were a little bit smaller than the ones Tunde used. It was no big deal for most of the patterns, but for the grid, bigger would have worked better. We were supposed to pipe a beautiful snowflake design, but I did not have enough squares in my grid to do that, so I improvised a much simpler pattern. You can see them below….

For the brush embroidery, Tunde showed two different designs, but I could only make one of them work. I will definitely try the second one in the near future. The four cookies below were definitely my favorites!

I find the combination of dark and light blue pretty magical,
and the white details take it all to a higher level.

I had a few hexagon cookies left, and a couple of days later I decided to bring the center cookie back to life with a different color scheme.

I really want to re-visit this whole class, now that I am back into the swing of decorating. My goal is to make the snowflake design on the grid, and then tackle the second embroidery cookie, which has a beautiful single rose in the center, with a long stem. The shaping of the petals is not that easy for me, but I want to make that happen.

Tunde, thank you for another great tutorial, I learned a lot with this one…

ONE YEAR AGO: Smitten Kitten Mittens

RUFFLED HEARTS

To watch Marlyn’s tutorial on youtube, click here

This design is perfect to practice different skills using Royal icing, and that was Marlyn’s goal when she came up with it. I suggest that you use a large cookie because it will make the whole process a lot easier, more space, more freedom to move the icing tip around. I used the largest heart-shape cutter from the 101 Wilton Set. Come to think of it, you don’t even need to add all the bells and whistles. The design looks pretty nice even in the initial stages. I loved making them!

At first glance, you might think that this would be a two-day cookie adventure, but it is not. There is no need to wait for each layer to dry for more than 30 minutes, or even less if you own a dehydrator. So a few of these can be made in a little over one hour, start to finish.

I strongly advise that you watch Marlyn’s tutorial because she shows the whole process in detail. The diagonal lines are very effective, but if you prefer to avoid piping them, you can add white dots to the center (wet-on-wet), and that will look cute also, simplifying the piping. Adding the two final edges of ruffles hides any imperfection in the joining of the fine lines with the edge, so the cookie will look very polished. I added a little diamond dust in the end because I cannot skip the opportunity for bling. You know how I roll… 😉

ONE YEAR AGO: Diwali-Inspired Gingerbread Cookies

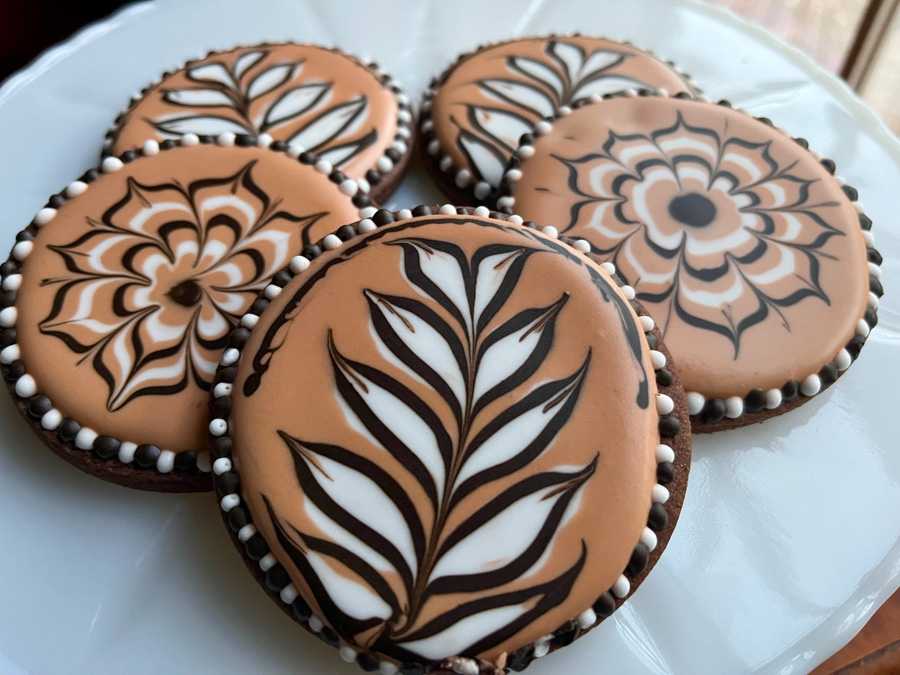
FOR THE LOVE OF COFFEE


Coffee lovers, these are for you! Sugar cookies and macarons take the spotlight today. The sugar cookies were made quite some time ago, inspired by Amber (click here for her blog post about it). I love when a cookie requires very few colors to shine, and these are a perfect example. White, plus two shades of brown. Nothing else needed. The wet-on-wet design is simple by default, making these cookies a great option for beginners.

.
It is a very simple design to make. Choose the background tone, flood, then make a very loose design with white Royal icing. Immediately outline with the second, darker tone of brown, and use a needle to pull the lines in or out, whichever way you like. For the flowers, just pipe concentric circles and pull with the needle. Quite relaxing to do, and no matter what happens, it will look nice in the end. A perfect cookie decorating adventure! A border with two tones of icing dots is optional, but it does make the cookie more festive.

And now, for Java Macarons! I made French meringue macarons with buttercream coffee in the filling. The shells were light beige, and I painted the coffee beans with luster powder + vodka. The outline is food safe pen (thick brush type), also used to write JAVA on the shells (but a pen with very fine tip). A little more time-consuming, but not too bad.

.
To draw images on macarons, the only thing to worry about is having a reasonably smooth shell. If it gets too rough, the drawing won’t look very good. I like to go a little longer in the macaronage, just to make sure I get a smoother shell.

If you are a coffee lover, this post is dedicated to YOU!

ONE YEAR AGO: A Bouquet of Flowers

OUT OF THIS WORLD COOKIES

I’ve made this set almost a full year ago, but for some reason they never showed up on the blog. They were designed by Amber, and each one is painted by hand, so it’s not the type of cookie you want to rush or make a few dozen at a time. But if you enjoy painting, they are a nice way to spend a couple of hours of your weekend. To read Amber’s post and find her tutorial, click here

.

To make these cookies, you start from a flooded, fully set background with white Royal icing. Then you decide on the shape and size of your planet (or star) and paint a background trying to get the edges darker. Once that is done, have fun imagining colors and of course, aim for a Saturn-like entity with a nice ring around it.

A few white dots or luster gold sprinkles will make the design even better. Just have fun with it, I am not a talented painter as Amber, but I still had fun and liked my babies.

I also made a little batch of stars, these quite simple to do, you just marble the icing and then add sprinkles. Together, they form a nice group of cookies to give to a special friend or share with your family.

ONE YEAR AGO: Springerle Cookies

WREATHS AND TREES

With this post, I will finally close the chapter on Christmas designs… Last year I made wreath designs using the appropriate cookie cutters, this time I decided to improvise and use two round cookie cutters instead. Scalloped edges give a touch of elegance, although I admit, icing that is a little more tedious. I used two different methods to decorate – adding texture with a fondant baller, or adding a delicate pattern with stencil and air-brush. I honestly do not now which one I prefer, so you decide!

All the cookies get flooded with green. Two of them were allowed to set overnight, or for at least 6 hours. The other two had the surface textured once the icing starts to crust. It is hard to tell exactly how long to wait, as it will depend on the consistency of your icing, the humidity of the environment, and of course the recipe of icing you use. But you can wait for 30 minutes and try one spot, see how it behaves You want the icing to give in but not crack. The second design was air-brushed in gold using a stencil. All of them got the same decoration, a little fondant painted with food gel + vodka.

.

I used the exact same color of green to make a tree to match the wreath,
and added a couple of fondant decorations just for fun.

Another combo of tree and wreath with a slightly darker shade of green…

I ended up making quite a few of the wreaths, because I loved the design so much… As to trees, they were for the most part quite simple and straightforward…


Flooded in green, texture with fondant baller, and a few dots of red + sparkle of luster gold diluted in vodka.

Two tones of green, allowed to crust for a while, then the edges of two colors pressed with a fondant baller, next day painted in gold.

Super simple designs again, just a little brush embroidery with white Royal icing on the top ones, and even more basic design on the bottom.


Finally, for something completely different, a pink tree, design suggested by my friend Toni. Just flood with pink, wait for it to crust well, and add swirls with piping consistency pink, I used a slightly darker shade. Add sprinkles, and you are done! Many other colors will work too, and you can also do the swirls in a contrasting color instead of keeping it monochromatic, although I prefer this way, I think it is quite charming and elegant.

Save these ideas for next year! I can always say I was THE FIRST to blog on Christmas cookies in 2023! HA!

ONE YEAR AGO: For the Love of Snowflakes

AMY’S CHRISTMAS HEXAGONS

One more series of cookies designed by Amy, this time the class was not live, but a series of videos pre-recorded so that each person made the cookies whenever most convenient. The full set had 10 cookies, I did not make them all, but loved each one that was born in my kitchen. Here you can see some of them…

To find out more about Amy’s online classes, check her Instagram page with a click here.

.
I also made a couple of Christmas trees to match some of the cookies, and some round ones with the swirl border which I absolutely love.


Below, some of the prep stages of the cookies. The candy cane design was not from class, I had watched a reel on Instagram showing the technique and decided to add to Amy’s designs.

.
My favorite design from class was definitely the one below…

.
I love the elegance and simplicity, the division of the cookie in two sections adding texture as sanding sugar to half of it. Definitely my favorite. I made a little Christmas tree inspired by it.

.

Another great design that I confess I did not hit correctly, is the poinsettia. I should have been more careful when I planned the positioning of the petals, but I still like the way they turned out. Amy teaches how to pipe all the petals using tipless piping bag, a great skill to have under your belt.

.

We also made a nice little snow-covered brunch…

And, bringing back the hexagon with the swirl border, my green colors were a little thick, but I love the way that gave a little bit of extra lift to the design, so I will keep that in mind for the future.

I love this series, and hope to re-visit the techniques again in the future, as well as making the few I did not get to yet. The swirl border can be made in many different ways, as you can see in the composite picture in the beginning of my post. Great for Valentine’s also, so get your imagination going!

Amy, those were amazing designs, thank you once again for the super detailed instructions in all of the videos!

ONE YEAR AGO: Happy New Year from the Snowy Village!