CHRISTMAS ORNAMENTS

Christmas is over, but I did not get to share all the cookie designs I’ve made in the past few weeks with the season in mind. So I am forced to go on with the holiday theme for a while, maybe two or three more posts. Such is the life of a cookie blogger… Ornaments are a lot of fun to play with, not only you can use cookie cutters with the perfect shape, but you can also add fondant ornaments as decorations in a round, rectangular, or plaque format. And you can even add holes to your cookies and turn them into real hanging treats for your tree. Let’s go over each one of these ideas, shall we?

DESIGN #1
SPRINKLED ORNAMENTS

I love how festive those are, and how easy to put together. I used Chocolate-Chipotle as the basic cookie, then all you have to do is ice the part that you want to add sprinkles to. Cover with sprinkles, let that set for 30 minutes or so, and flood the rest. Painting the hook part with gold is optional, but I think it elevates the design a bit.

DESIGN #2
WET-ON-WET


Always so striking and very easy to make, just add horizontal lines with contrasting color to the flooded base while still wet, and pull with a needle in one direction, then the other. The closer you make the lines, and the more lines you add, the better. But you can also add the pattern to just a small portion of the cookie, as I did below…

.

DESIGN #3
HANGING ORNAMENTS

You can pick any cookie shape you want, from snowflakes to Christmas trees, bells, ornaments, just make sure they are large enough to incorporate a hole on the top. Then use any decoration style you feel like to bring the ornaments to life.

DESIGN #4
FONDANT ORNAMENTS

For this type of design, any shape of cookie cutter will work, just pick a background color and make little fondant ornaments, in my case I chose to spray them with Wilton gold. A little hanging line piped with a very thin icing tip, is all you need to finish things up. The possibilities of color combinations are endless….

Fondant decorations can come in quite handy for other shapes too… And they can be made in advance and just wait for the right opportunity to play…

DESIGN #5
PLAYING WITH TEXTURE

I loved this set so much! The central ornament was flooded with red, next day thick Royal icing was applied with a stencil. The other ornaments were painted with Americolor White before baking. Then just a few details added to complete the design.

So that wraps up the ornament concept for the year of…. 2022. With the speed that time is flying, I bet it won’t take long for the next round of Christmas-themed cookies to show up here!

.

ONE YEAR AGO: Is it a cupcake? Is it a fern?

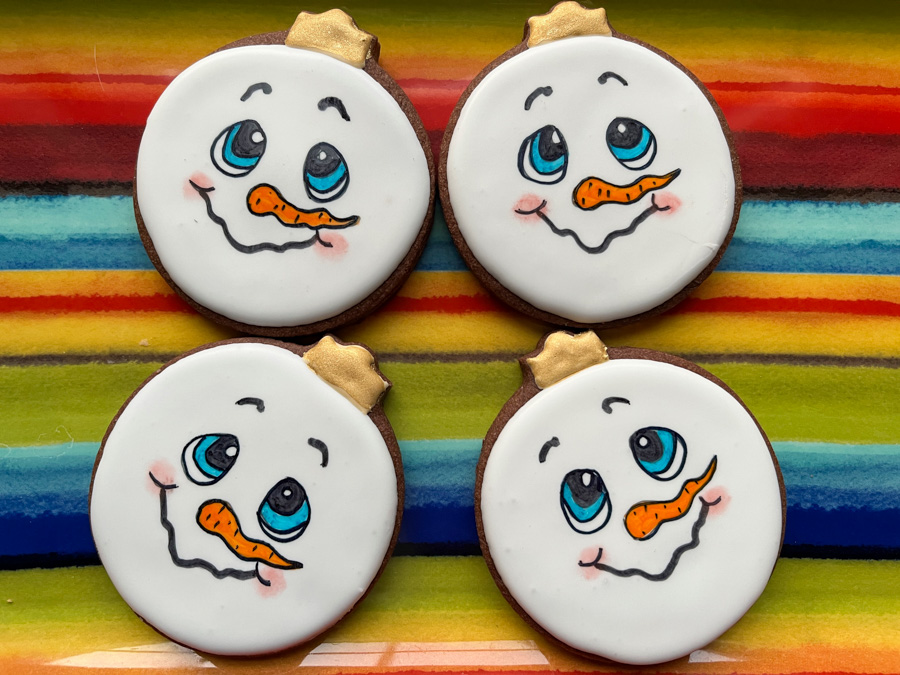
LET IT SNOW, LET IT SNOW, LET IT SNOW…

MERRY CHRISTMAS!

I am totally, completely, absolutely, overwhelmingly in love with these cookies! Why? Because they were painted free-hand, thanks to the guidance of the one and only Michelle, inventor of Sugarprism. She hosted a Facebook event where several members of her group got busy decorating with her in real time. I had so much fun bringing these two guys to cookie-life.

Find Michelle’s info through her IG page with a click here.

Below you see some of the steps in the painting process, that happened on a naked cookie, no Royal icing at all… Michelle uses little guiding dots to space the different portions of the design, so that everything ends up with perfect proportion in the end. Even to paint the star, she had a cute method so that the points would end up exactly where they are supposed to. We started making a blue background darker in the edges and lighter in the center, and then slowly painted all the components on top.

As usual, her classes are fun, light, and make you feel super empowered – that feeling of – I PAINTED THAT – did not leave me for a long, long time!

Another advantage of this method is that you will use no Royal icing at all. Sugarprism has excellent coverage even on the naked cookie, and its delicious vanilla flavor won’t negatively interfere with your bake.

I am not sure I will ever be able to paint something without a guiding hand to lay out the path for me, but maybe one day I might be able to look at a painting and figure out how to do it myself. Could be a little goal for the new year…

ONE YEAR AGO: Christmas Cookies

THE MANY FACES OF FACES

Time to have some fun with cookies! Some are super easy to decorate, some required (for me) a mini-projector but you might be able to draw them free hand. They all make me smile, and I do hope they gave a smile to those who received them…

I first saw this design on a closed group on Facebook for Sugarprism painting. I used the food projector to get the image on Royal iced cookies, and painted with a food safe pen, then added the blush detail with red luster powder. Once I made them, I realized that a search for snowman faces gives many examples, so I “cookied” some more. Aren’t those super cute?

I also made some to work as real Christmas ornaments, by including a small hole in the cookie, as you see below…

They seem quite comfortable around a certain infamous character…

I had a lot of fun making the trio of cookies below….

Now let me share cookies that are a lot simpler to make… The gingerbread stars were suggested by my friend Toni, and I modified a few things from the picture she shared. The eyes were piped with black icing, and the blush is again red luster powder on the naked cookie. Eyebrows and smile were made with a food safe pen.

I loved them so much that I made a second batch, this time with chocolate-chipotle dough, and green eyes, for better contrast.

Another fun way to play with faces is using store bought sugar eyes, which makes it all even simpler. Those are popular on Halloween but you can still find them in places such as Jo-Ann or even big grocery stores. I used thick Royal icing to make the metal part of the bulbs, but you can just flood the whole thing and draw the details with a food pen. It will be equally cute.

I hope you enjoyed this fun collection of cookies. Just remember that cookie decorating should bring you joy, not stress. So keep calm, and pipe on!

MARLYN’S INSPIRATION POST FOR DECEMBER

Once again, the task for the month of December was very simply stated: use metallics to decorate your cookies. There are two ways to do it, you can air-brush or spray paint using products available from Wilton (such as this one) or from PME (such as this one). When you consider how fast the spray painting can go, it is a super efficient way to decorate many cookies at the same time. Of course, if you are going to gild the lily with extra piping or sprinkles, that will add a bit more time and effort, but in my opinion it is totally worth it.


For all the designs I used flooding either with Americolor Gold (to spray gold later) or Americolor Gun Metal (to spray silver). Once that base is set, I added details in piping consistency using either a similar color or white. That then gets painted with luster powder. If you start from white flooding, the metallic effect will be less pronounced, and the final color a bit more faded.

A similar approach will also work with silver…


I also like pairing silver and gold…


Of course, other shapes benefit from metallic decoration also… For the light bulb, I coupled Wilton Silver spray with luster powder bronze for the top and gold for the streak of light on the left side. The modern tree got gold on silver.

Bells also love a little shine, the one below quite simple to decorate, with a border using brush embroidery.


Solid gold pairs nicely with some sprinkles, in this case to make a real ornament that can be hung from a Christmas tree…

So many possibilities, including adding a metallic finish to Springerle cookies….

I loved this month’s inspiration challenge, and confess it was hard for me to stop making more designs…


I hope you’ll consider incorporating metallics into your cookie decorating, I am already dreaming about some serious shine for Valentine’s!

ONE YEAR AGO: Amy’s Christmas Cookies

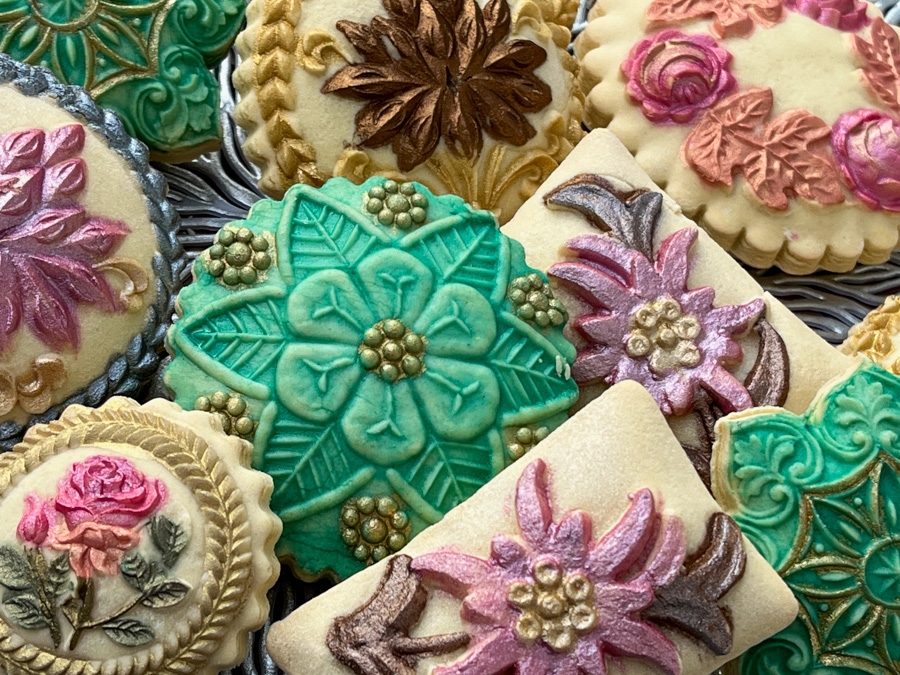
SPRINGERLE BAKING TIME!

One of my favorite cookies to make this time of the year, they are a bit of a labor of love, but the more I make them, the more I love their unique flavor and texture.

My default recipe for springerle is published in my food blog (click here). I have shared a detailed post and video about painting springerle cookies, and you can find those here.

In this batch, the new technique was glazing instead of painting. I used this method to make the green-teal cookies shown below.

The method is very simple: mix honey and vodka 1:1 BY WEIGHT, not by volume. If you do by volume there won’t be enough alcohol and the honey will stay sticky. You can even use a little more vodka than honey to make sure it will dry without any issues. Add a tiny amount of the gel color of your choice. Paint that with a brush, preferably not silicone brush, because those tend to add too much liquid. Once that is dry, you can paint the final details with an accent color (I used gold luster).

All other biscuits from this batch were painted as I have shown in the video, with luster powder mixed with vodka. I’ve had these flower molds for many years, and I never get tired of using them.


This is another favorite mold of mine, that can be decorated in many different ways as far as colors go.

Another great mold I use every year is the rectangular one below…

Springerle is perfumed with anise, and lasts for a long time, so they are perfect as cookie gifts. The molds are not cheap, so if you are interested in starting to bake this type of cookie, brace yourself for the initial investment. But if you have a good quality mold, it will last for a lifetime.

ONE YEAR AGO: Marlyn’s Hungarian Tree

A PRINCESS CARRIAGE

How adorable is this cookie? I won’t sugar coat the pill (I only sugar coat cookies), this one is a labor of love. I cannot imagine making a dozen of them, but it is a cookie that you can include in a set of simpler ones to make it special. The design has Haniela’s name written all over it. You can see the video of her recent live clicking here, and to get all the templates for the decoration you can visit her ko-fi shop here.

To make the cookie base, Haniela used the larger heart of the Wilton 101 cookie cutter set. It is going to be a two day process. First, flood with blue, add the grass and clouds with wet-on-wet Royal icing. Then, once the base is fully set, draw the design (I used a yellow food pen), and flood the carriage part in stages, and pipe the wheels. Once that sets – no need for a long time, maybe a couple of hours, add the final details with thick consistency icing (I used gold color), and a small star tip and a number 3 piping tip. Later those details can be painted in gold.

I also painted the pink carriage with luster powder in Rose Gold just to give it more dimension. I just adore this little cookie!

ONE YEAR AGO: A Christmas Tree Party

GINGERBREAD PEOPLE

Probably the most popular shape for the season, these days you can find super cute cutters with all sorts of twists on the classic. But these? These are the classic, simple shape, made special by the little details as Royal icing transfers. Who else but Marlyn could come up with all that, right? To see her recent live on this design click here. To have access to her template sheets to pipe the decorations in the correct size for the cookie, you’ll need to join her Patreon site.


Aren’t those adorable? Marlyn made chocolate cookies with gingerbread color icing, but I opted for gingerbread cookies, and used my default recipe that is available on my food blog (click here). The cookies are very very big, part of Wilton 101 cookies. The price in amazon is ridiculous. I found it at Michael’s for less, but I am offering you the link so you can see what to look for.

It all starts by piping the transfers. I made icing in black, red and green, but the little hearts for the mouth I made in white and then painted with pink gel dye.

The final touch is to add a little blush to the cheeks with a soft brush….


The cookies are really big, but you could adapt the same style of decoration to smaller cookies, as long as you decrease the size of the details proportionally. Or you can just draw them with a pen or even use wet-on-wet. It will still look pretty cute.


I also made a little variation on the theme, this time for a very small cookie… but the overall idea is the same.


ONE YEAR AGO: Christmas Time Macarons

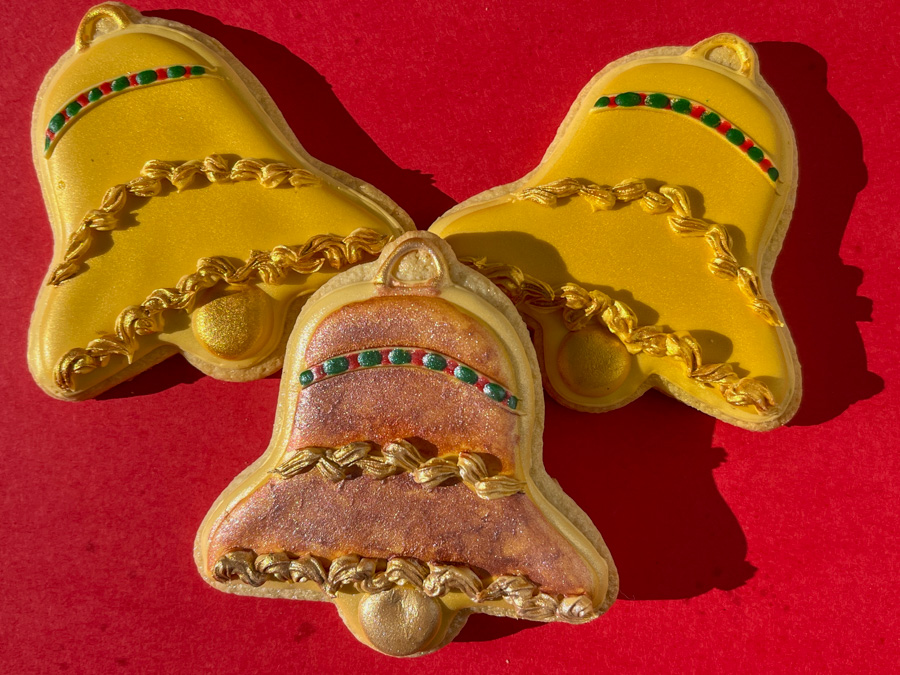
OF BELLS, CANES AND ACORNS

No more holding back! The holiday season is here to stay, at least for a while, because truth is, we will blink our eyes twice and Valentine’s will be peeking from the corner. Today I share three cookie shapes very popular for the season.

HOLIDAY GOLDEN BELLS

This beautiful design comes from a recent Facebook live from Marlyn. You can watch it with a click here. I want to repeat these cookies making a composite like she suggested, and also using the same spray she did to get the golden coverage. I ordered a can, but it has not arrived yet. For this batch I used my air-brush but the gold is not very strong. I painted the details with luster powder to make the gold more evident.

I love everything about this design, if you make it, try to get a bigger curvature at the bottom, so that the inside of the bell is more evident. Every detail you pay attention to can make the cookie look better in the end. I just find it hard to cover all the details on the first time, it is hard for me to see the “bigger picture.”

.
GINGERBREAD BELLS

These are my own design. All details of these cookies are made with piping consistency icing, either over a naked cookie, or on a fully set background of icing in the color of your choice. The light shine on the cookies is a coating with PME pearl spray, which I think does a nice job particularly on the naked cookie. I also played with a different color combination, using black piping consistency for the details.

.
DIPPED MARBLED HOLIDAY CANES


These cookies, like the golden bells, also come from Marlyn. For a quick tutorial to see exactly how to make them, check this video. These are fun and simple to make. Marbling in many cases calls for drops of food gel on the surface of runny icing, but that method has some drawbacks. The density of the dye and the icing is different, if there is accumulation of dye in some spots it won’t look very smooth. The trick that Marlyn uses is to make royal icing in the colors to be marbled and add that to the surface instead. Works like a charm! Once you do that marbling, the cookies already look pretty cute, and you can be done. But of course, if you have time and want to add the further embellishment, go for it. You’ll need piping consistency icing. I used Gold from Americolor and then painted with luster powder, exactly as demonstrated in the video.


ACORNS


Definitely the simplest of all designs, all you need is flooding with brown, same color of icing in piping consistency for the details. Once it is all set, I brushed some copper luster powder on the piped area, and called it a day!

I hope you enjoyed this small set of holiday-inspired cookies. I have many things planned and looking at the calendar, I am not sure I’ll be able to get to them all this year. Way too many cookies, way too little time!

ONE YEAR AGO: Let the Holiday Bakes Begin!